MTI Instruments, a company specializing in non-contact measurement solutions, offers the Accumeasure capacitance-based systems that are specifically designed to perform noncontact measurements of runout, position, vibration, and displacement.
These instruments can also now be employed to measure the thickness of dielectric materials. Dielectrics are a special kind of material which behave more like insulators than conductors.
Measuring the Step Height Thickness of Non- Woven Conductive Films
Operation of Accumeasure System
The Accumeasure capacitance sensor utilizes a steady current of signal source at 100kHz (Accumeasure 5000) or 16kHz (Accumeasure 500 and 1500) carrier frequency. The probe or transducer serves as a passive element and does not include any active electronic circuitry; however the Accumeasure electronic amplifier contains all the circuitry which is delivered to the probe via a coaxial cable.
A control voltage is supplied by the Accumeasure constant current amplifier circuitry so as to maintain the sensing current across the rated displacement sensing range of the amplifier and probe. A highly accurate buffer amplifier is then utilized to drive the coaxial capacitance probe structure and the coaxial cable shield at the same phase and amplitude as the sensing signal.
This ensures that all stray capacitances are cancelled out, allowing the amplifier to react merely to the capacitance present between the target surface and the face of the probe. This enables the Accumeasure amplifier to show a linear response to changes in dielectric material thickness or changes in the gap.

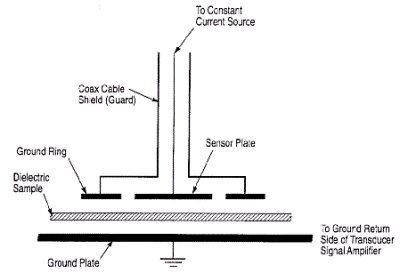
Figure 1. A ground return path provided from the target to the low side of the Accumeasure amplifier to complete the current path.
The Accumeasure system works as a standard parallel plate capacitor system. In order to finish the current path, it is necessary to provide a ground return path from the surface or target being measured, to the low part of the Accumeasure amplifier, as illustrated in Figure 1. In many applications, the target is at ground potential and the ground return path is supplied via the grounded power cords, but it is better to join a grounding wire from the target to the connector on the Accumeasure amplifier.
During the measurement of the thickness of dielectric materials, a permanent gap is created between the grounded return plate and the face of the probe. The material to be determined is placed in such a way that it contacts the surface of the ground return plate or it can be placed in the permanent gap. If the material moves, it can be passed via the gap sans any contact. These tests can be effectively performed with MTI’s precision calibration micrometer fixture, KD-CH-IIID.
Working Principle of Accumeasure System
The Accumeasure equipment works on the following basic principle:
Cp= K(A/D)
where Cp is the capacitance formed between the target surface and the face of the capacitance probe, A is the area of the sensing electrode at the probe face, D is the distance between target surface and the sensing electrode, and K is the dielectric constant of the air, along with other physical constants.
Given that the Accumeasure system functions as a constant current supply, then:
Vo α (l/Cp) where Vo = amplifier output voltage
Cp α (1/D)
then Vo D
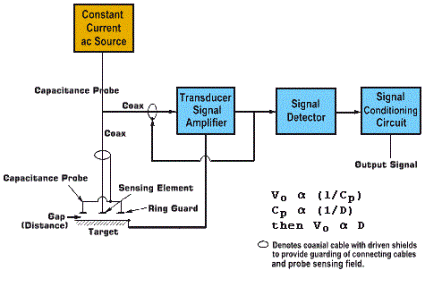
Figure 2 shows a layout of the Accumeasure circuitry and sensing method. The coaxial cable capacitance is cancelled by an active current, and deviation of the electric field at the face of the probe is prevented.

Figure 2. Block diagram of the Accumeasure circuitry and sensing technique.
In case an insulating material with a dielectric constant higher than air is integrated into the sensing gap, the capacitance Cp will be modified even if the fixed gap between the ground plate and the probe face remain constant. This effect can be employed to determine the sample’s thickness.
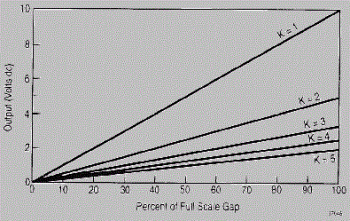
In case the dielectric constant of the material to be tested is known, it is possible to determine the thickness using the procedures given below. Given that Cp = K(A/D), if A and D remain constant, then Cp α K. Figure 3 illustrates he output voltage against gap when the gap is filled with air having a dielectric constant of 1.0, or other non-conducting material with a dielectric constant of higher than 1.0.

Figure 3. Output voltage versus gap
Method A
When the dielectric constant of the test material is known:
If a capacitance probe and an Accumeasure amplifier are assembled at any air gap within the system’s operating range, the Thickness Sensitivity Factor for a material with a specific dielectric constant can be computed as:
Thickness Sensitivity Factor = Operating gap
VoAir- (VoAir ÷ K)
Method B
When the dielectric constant of the material to be measured is unknown, but the thickness of a sample is known or can be independently measured:
The sample is inserted into the operating gap and the change in the output voltage is measured. Then, the sensitivity factor can be computed as:
Sensitivity Factor = Sample Thickness, in inches = 0.0021"/Volt
(10.00 - 7.63)
Method C
When the dielectric constant of the material to be measured is unknown and a sample of known thickness is not available:
In case the dielectric constant of the test material is unknown, it can be determined with the help of the Accumeasure system. In this method, the sample of the material is placed in the operating gap and the gap is adjusted till it is completely filled by the test material. Next, a reading of the output voltage is obtained and the material is taken away sans changing the gap setting. The reading is again taken sans the material in the same gap. Consequently, the dielectric constant can be computed as:
K= Vo AIR
Vo Sample
After establishing the dielectric constant, Method A can be employed to determine more samples of the same material. The differences in output voltage can be multiplied by the Sensitivity Factor to ascertain the potential error in the thickness reading. In case the dielectric material is coated on a single side, this side must be placed in such a way that it contacts the grounded reference plate. This will help in achieving accurate thickness measurements.
Conclusion
The dielectric constant of most gases is close to 1.000 and hence does not considerably impact the probe’s output signal when used as a displacement sensor with respect to a conductive target. The dielectric constants of most oils, plastics and glasses are 2 to 5 times greater than air and hence these products be used to perform noncontact capacitance-based thickness measurements. However, in order to obtain accurate information regarding displacement or thickness, the dielectric factor must be determined accurately.
About MTI Instruments
MTI Instruments is a worldwide leader in the design, manufacture and engineering of non-contact measurement systems and sensors.
MTII’s main products consist of computerized general gauging instruments for position, displacement, thickness and vibration applications based on laser triangulation, fiber-optic and capacitance measurement technologies.
The Semiconductor Products sensor group manufactures manual, semi-automated and fully automated wafer characterization tools designed to measure wafer thickness, total thickness variation (TTV), bow, warp and flatness of semi-insulating and semiconducting materials.
MTII’s Aviation Balancing Instruments group provides state-of-the-art portable balancing and vibration analysis systems for turboprop and jet aircraft engines.

This information has been sourced, reviewed and adapted from materials provided by MTI Instruments.
For more information on this source, please visit MTI Instruments.